Bandai 1/48 scale X-Wing Model Build
Monday, December 31, 2018
Part IX Final detailing and weathering
This will be a rather short blog, as there's not a whole lot I can really show when it comes to the detailing and weathering. But here it goes.
The first thing I did was use some of the decals that came with the kit for additional detailing. Mostly some wing markings.
Because the decals are so vibrant and just pop, I used some Tamiya light sand and snow pastels to dull and tone down the decals.
I then moved on to some weathering. Again, using Tamiya pastels, I started darkening up the engines with the Oil pastel.
Next, I moved on to some washing, starting with Tamiya medium gray. I focused on the upper rear section of the X-wing, but did some washes around the entire ship.
Then moving on to some Tamiya German gray.
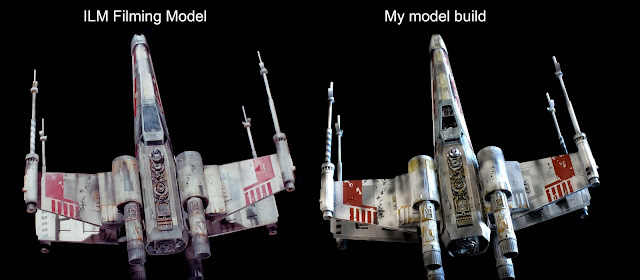
I next moved on to some rust washing, as the X-wing has a lot of rust on it when looking at the photo reference of the filming model. I did this using Vallejo dark rust, but lightened it up a tad with some Model Masters yellow, to more closely match the color of the filming model rust.
I then started on the battle damage detailing. I did this using Tamiya Neutral gray and a very fine brush to as closely as possible, match the battle markings on the filming model.
And finally, I moved on to doing some airbrush, again, using Tamiya German gray for the streaking around the ship and for dirtying it up.
Here are some comparison shots of my finished model next to the filming model.
So that's it for the detailing and weathering of my X-Wing. Check out the final blog for all of the studio photos.
Subscribe to:
Comments (Atom)


